Your Shopify store may have duplicate pixel installations or the remnants of past pixel installations still active on your site. Using the Meta Pixel Helper plugin for Chrome, you can quickly uncover how many pixels are being detected on your site.
Description: Use the Meta Pixel Helper plugin on Chrome to identify whether or not you have multiple pixels installed on your site.
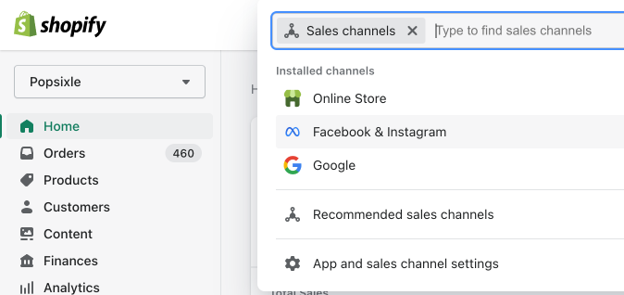
The ideal way to install the pixel is through the Facebook Sales Channel within Shopify. We recommend that you leave that integration intact and remove any other manually pixel installations from your site.
There’s a few places to check within Shopify to find code that might be responsible for your second pixel installation.
- Your active theme
- Your checkout settings
- Within your Google Tag Manager account
Finding Facebook pixel code within your Shopify theme
The first place to check for Facebook pixel code is within your active theme.
- Log into your Shopify admin
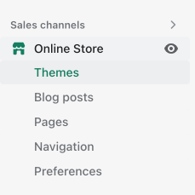
- Navigate to Sales Channels > Online Store > Themes
- Choose Edit Code
Description: Click into the Themes section of the Shopify Online Store Sales Channel to edit the source code of your Shopify Theme.
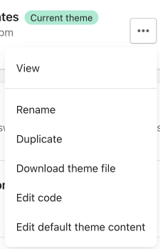
Description: Click Edit Code to gain access to the source code of your active Theme your Shopify store is using.
If you are not comfortable with viewing, editing, or saving code changes in your theme, stop here. Feel free to share these instructions with a developer or technical resource who is more comfortable.
Before making any changes to your theme, make sure you have a backup of your active theme. If anything breaks, you want to be able to roll back the changes easily.
Here are several likely places you might find Facebook pixel code within your active theme’s liquid theme files:
- header.liquid
- footer.liquid
- theme.liquid
Scroll down in this article for specific examples of what Facebook pixel code looks like. Once you find the code, you’ll want to remove it and reload your site to see if the problem has been corrected.
Finding Facebook pixel code within your Shopify settings.
The next place to check for Facebook pixel code is within your Checkout settings.
- Log into your Shopify admin
- Navigate to settings (clicking the gear icon at the bottom left corner)
- Choose Checkout

Description: Once logged into the Shopify admin panel, find the Settings gear in the bottom left corner of the screen.

Description: From the list of Shopify settings, click into Checkout to alter settings and scripts that load when customers are checking out of your store.
At the bottom of the Checkout settings, you’ll see a section called Order Status page > Additional Scripts.

Description: Within the Checkout Settings on Shopify, look for the Additional Scripts section to identify custom code that runs when orders are completed.
Look within that box for any signs of Facebook code. Scroll down in this article for examples of what Facebook pixel code looks like and steps on how to remove it.
While you are in the Settings section of Shopify, also take a look at the Customer events tab.

Description: From the list of Shopify settings, click into Customer events to find Custom Pixels that have been added to your store.
This would show any custom pixels that were installed in your shop. You can click into each listed pixel and connect, disconnect, delete, or edit the code. If you find one that may be installing Facebook’s pixel on your site, try disconnecting the pixel. Then reload your site and see if that fixes the double-install issue.
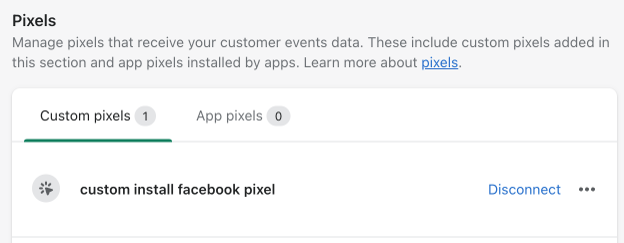
Description: In the Customer Events settings, you’ll see a list of Custom Pixels that you can edit, delete, or temporarily disconnect.
Finding Facebook pixel code within your Google Tag Manager settings.
First you’ll want to check and see whether you have Google Tag Manager installed on your Shopify store and, if so, identify the GTM container id being used.
Using the Chrome browser, navigate to your Shopify store homepage (not the admin view, the actual live store homepage that customers see). Right click anywhere on the screen and select “inspect” from the pop-up menu.
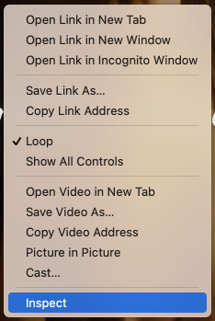
Description: When using the Chrome Browser, right click on the screen and select Inspect to open up a panel of advanced developer tools.
This will open a panel with advanced developer tools. Click over to the “Console” tab. There may be some errors or messages already listed in your console. Click the small circle+slash symbol to clear the console.
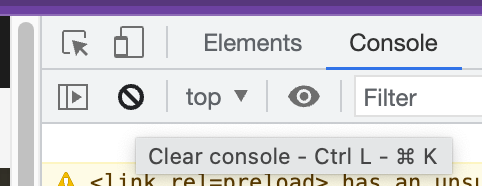
Description: Chrome’s advanced developer tools include a Console, which lets you query page objects and read messages and errors from active page scripts.
Then move your cursor to the prompt in the console and type “google_tag_manager” and press enter.
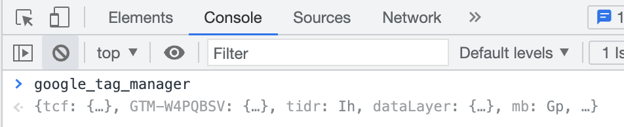
Description: Entering the name of a page object into the Console will allow you to view and inspect the contents of that object.
If you have GTM installed, this will list out the details of the Google tools installed on your site.

Description: The google_tag_manager page object will contain container ids for your installed Google apps.
Click the small gray triangle at the left of the text to expand the contents. Any row beginning with GTM is evidence of Google Tag Manager. Make note of the letters after the “GTM-” as that is your container id.
Now log into your Google Tag Manager account and ensure that you are in the container that matches the container id you just found on your website.
Go to your Tags and look for any configured tags that have names associated with Facebook, Meta, pixel, etc.
You can select a single tag and click the pause button to stop it from executing, but without deleting it.

Description: Any Google Tag Manager Tag can be temporarily shut off by selecting it and clicking the Pause button.
After you’ve paused all tags that may be tied to Facebook pixel events, use the Submit button to push the changes live. Now reload your site and look to see if there are still two pixels registering on the page.
What does Facebook’s pixel installation code look like?
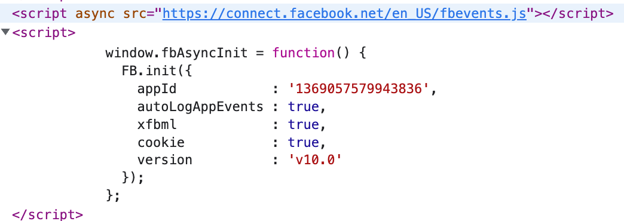
Here are some examples of what Facebook pixel code looks like:
Description: One method of installing the Facebook pixel on your website is with an async script getting loaded with your account settings.

Description: One method of installing the Facebook pixel on your website is with an async script loading the Facebook sdk.
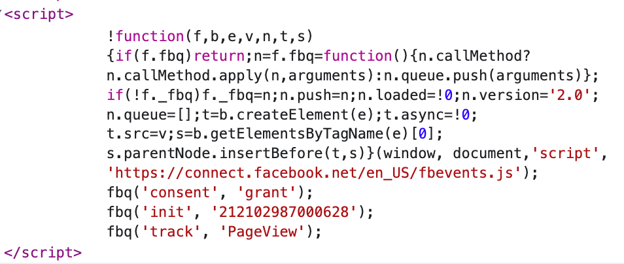
Description: One method of installing the Facebook pixel on your website is with the fbevents script and an init function.
To find any of these code snippets, trying searching for any of the following within your code or scripts:
- FB.init
- connect.facebook.net
- fbq
Should you find any of this code, you may choose to delete it or comment it out by adding “//” before each line. Again, please be sure to back up your code, theme, and settings before making any changes.
How to install the Facebook pixel correctly on Shopify
The tightest integration of the Facebook pixel for a Shopify store is to use the built-in integration within the Facebook/Instagram sales channel.
Description: The place way to install a Facebook pixel on Shopify is through the Facebook & Instagram Sales Channel.
Here’s a link to Shopify’s guide to installing and configuring the Facebook pixel
https://help.shopify.com/en/manual/promoting-marketing/analyze-marketing/facebook-pixel
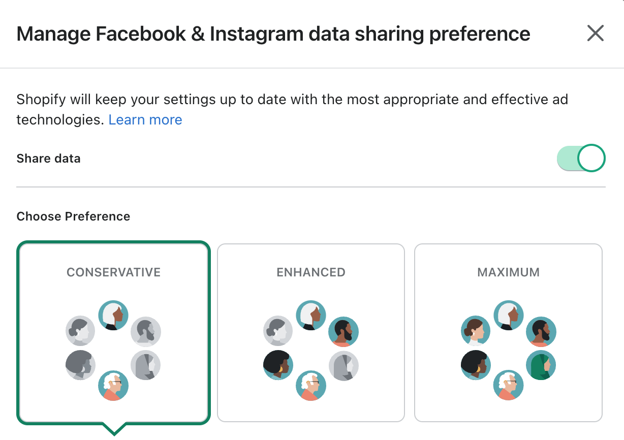
Description: There are various levels of data sharing between Shopify and Facebook. Conservative shares browser events only. Enhanced/Maximum also shares server events.
Note that when you configure data sharing settings, choosing the Enhanced or Maximum settings will turn on Shopify’s Conversions API connection. This connection has some serious limitations that we’ve written extensively about. To get the best Conversions API connection, work with a provider like Popsixle for an advanced, real-time connection that doesn’t drop any data.
How to determine that you’ve solved the problem of two or more pixels.
After taking the steps in this guide to try to find and remove additional and unneeded pixel installations, use the Meta Pixel Helper to check your site.
Here’s what it looks like when one browser pixel is installed:

Description: The Meta Pixel Helper should only show a single pixel installed on your website.
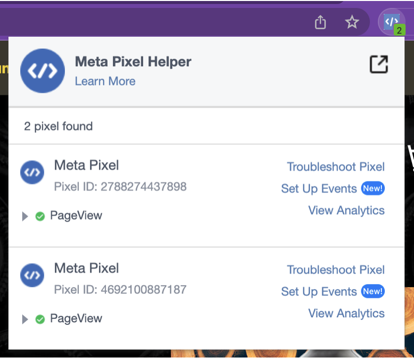
Here’s what it looks like when more than pixel is installed:
Description: The Meta Pixel Helper will show you when you have more than one pixel installed on your website.
You’ve fixed your pixel error - now what?
Congrats on getting your Shopify store correctly set up with the Facebook pixel. Hopefully this guide was helpful in achieving that goal. The next step is to get your server-to-server data connection optimally set up. Read more about Shopify and the Facebook Conversions API with our Ultimate Guide.